Introduction For a Budget-Friendly Sandakphu Phalut Trek
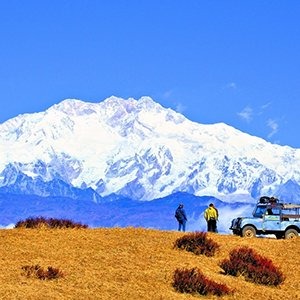
Trekking to Sandakphu and Phalut had always been on my bucket list. The idea of witnessing the breathtaking views of four of the world’s highest peaks—Everest, Kanchenjunga, Lhotse, and Makalu—was enough to make my heart race with excitement. However, my biggest challenge was to experience this adventure without spending a fortune. While many trekkers book expensive guided tours, I knew I could plan everything myself and cut down unnecessary costs.
After thorough research and careful planning, I discovered numerous ways to complete this trek in the most cost-effective manner. From choosing the right time and route to finding budget accommodations and food, I ensured that every step was planned wisely. Now, I want to share exactly how I completed the Sandakphu Phalut Trek on a budget without compromising on comfort and experience.
1. Best Time to Visit Sandakphu Phalut
The timing of my trek played a huge role in determining my overall expenses. I quickly realized that different seasons impact costs in various ways.
- Spring (March-May): This is the best season for trekking, as the weather is pleasant, and the trails are covered with blooming rhododendrons. However, the increased demand for accommodation makes prices slightly higher.
- Autumn (October-November): The views of the Himalayan range are at their clearest, making it another popular time for trekkers. This also means higher expenses on food and lodging due to high tourist traffic.
- Winter (December-February): I personally chose to trek in winter because it is the cheapest time. Since fewer trekkers venture out in the cold, I was able to get discounts on accommodation and food. However, I had to be well-prepared for freezing temperatures.
- Monsoon (June-September): This is the least expensive season, but it comes with the risk of landslides, slippery trails, and leeches. Although I wouldn’t recommend it to beginners, experienced trekkers looking for an adventure might find this an affordable option.
💰 How I saved money: Since winter has fewer trekkers, I was able to negotiate lower prices for my stay and food. Also, I carried extra warm clothes instead of renting costly winter gear.
2. Choosing the Most Affordable Route
One of the biggest ways I saved money was by carefully choosing my trekking route. There are multiple routes to Sandakphu, but some are more cost-effective than others.
- Standard Route: The most common and scenic route starts from Manebhanjan and goes through Tumling, Kalipokhri, and Sandakphu before reaching Phalut. From there, trekkers usually descend to Srikhola or Rimbik. This is the most beautiful route but can be costly due to accommodation at multiple stops.
- Budget-Friendly Route: To minimize expenses, some trekkers prefer starting from Srikhola and trekking directly to Sandakphu. This reduces the number of overnight stays and the total cost of accommodation. However, this route is steeper and more challenging.
💰 How I saved money: I chose the classic Manebhanjan route but reduced costs by staying in budget trekkers’ huts and skipping unnecessary stops. Also, I avoided hiring a land rover, which some trekkers use to shorten the journey.
3. Budget Transportation Options
Reaching the trek’s starting point, Manebhanjan, in a budget-friendly way was another critical aspect of my planning. Since this small village is not directly accessible by train or flight, I had to rely on a combination of public transportation.
- From Kolkata: I took a train to New Jalpaiguri (NJP) which cost me between ₹300-₹1,500 depending on the train class. From NJP, I boarded a shared jeep to Darjeeling (₹200-₹300) and then another shared jeep to Manebhanjan (₹150-₹250).
- From Delhi: A direct train to NJP was the most economical option (₹500-₹2,000). Alternatively, I could have taken a budget flight to Bagdogra and then a shared vehicle to Manebhanjan for ₹500-₹800.
- From Darjeeling: Since I was already in Darjeeling, I took a direct shared jeep to Manebhanjan for just ₹150.
💰 How I saved money: I avoided private taxis and opted for shared jeeps, which significantly reduced my transportation costs. Also, I booked train tickets well in advance to get cheaper fares.
If you’re planning the Sandakphu Phalut Trek and looking for a reliable trekking company to make your journey hassle-free, I highly recommend The Searching Souls. They offer budget-friendly packages, experienced local guides, comfortable accommodations, and seamless transportation arrangements.
4. Permits and Entry Fees
Since the Sandakphu trek passes through Singalila National Park, obtaining permits was mandatory. This was a cost I couldn’t avoid, but I found a way to make it more affordable.
- Permit Fees: ₹200 for Indian trekkers and ₹500 for foreigners. These can be obtained from the forest office in Manebhanjan.
- Guide Requirement: Guides are mandatory for those trekking beyond Tumling, and they usually charge ₹1,000-₹1,200 per day.
💰 How I saved money: Since I was trekking with a group, we split the cost of hiring a guide, making it much more affordable. Additionally, I ensured I had all required documents ready to avoid any extra charges.
5. Accommodation on a Budget
One of the biggest expenses during any trek is accommodation, but I found ways to minimize this cost.
- Trekkers’ Huts: These are the cheapest options and cost around ₹250-₹500 per night. Basic but comfortable, they provide dormitory-style sleeping arrangements.
- Homestays: These cost around ₹500-₹800 per night, often including food. Staying with locals also allowed me to experience their culture and hospitality.
- Camping: Although not very common, carrying my own tent would have saved me money. However, since I didn’t have a tent, I relied on budget stays instead.
💰 How I saved money: I always opted for trekkers’ huts instead of expensive lodges and shared rooms with fellow trekkers to reduce costs.
6. Food and Meal Planning
Food in the mountains is more expensive than in the plains because everything is carried up manually. While I couldn’t avoid all food expenses, I did manage to cut down on costs significantly.
- Local Meals: Dal Bhat (₹150-₹200) is the best option as it is filling and usually comes with unlimited refills.
- Affordable Snacks: Momos (₹100), Maggi (₹80-₹120), and Thukpa (₹150) were available at most stops.
- Carrying My Own Snacks: I packed energy bars, dry fruits, and instant noodles, which reduced my reliance on expensive trail-side food.
💰 How I saved money: I ate at homestays where meals were included in the stay price and avoided expensive packaged food.
7. Packing Smart for a Budget-Friendly Trek
Buying new trekking gear can be expensive, so I found ways to pack smart without spending too much.
- Renting Equipment: I rented a sleeping bag and trekking pole in Darjeeling for ₹50-₹300 per day instead of buying them.
- Essential Items: Warm clothes, thermals, gloves, and rain gear were absolute necessities.
💰 How I saved money: I borrowed warm clothes from friends instead of buying expensive jackets and used my regular backpack instead of purchasing a trekking-specific one.
8. Hiring Guides and Porters on a Budget
While hiring a guide is mandatory beyond Tumling, I found ways to reduce the cost.
- Group Hiring: Sharing a guide with multiple trekkers meant we each paid only a fraction of the cost.
- Porter Avoidance: Since I packed light, I didn’t need to hire a porter, which saved me an extra ₹800-₹1,000 per day.
💰 How I saved money: I trained myself to carry my own backpack and shared the guide fees with others.
9. Managing Emergency Expenses
No matter how budget-conscious I was, I had to prepare for unexpected expenses. Even though I was careful with my spending, I knew that unforeseen circumstances could arise at any moment. A small injury, a change in weather, or even altitude sickness could add extra costs to my trek.
One of the biggest potential emergency costs on the Sandakphu Phalut Trek is medical expenses. The higher I trekked, the more I realized how important it was to stay hydrated and take regular breaks to avoid altitude sickness. I carried a first-aid kit (₹200-₹500) that included painkillers, bandages, antiseptics, and medicines for altitude sickness. Another major expense could be emergency evacuation. If someone falls seriously ill, the only way down is via a private vehicle, which can cost anywhere between ₹3,000-₹5,000. Since I was trekking in a group, we made sure to check on each other’s health constantly to avoid any serious problems.
💰 How I saved money: Instead of waiting for an emergency, I took precautionary measures. I kept myself hydrated, avoided overexertion, and carried basic medicines so I wouldn’t need to visit a doctor. Also, trekking with a group ensured that we could help each other in case of minor injuries, reducing the need for professional medical assistance.
10. Tips to Save Money on the Sandakphu Phalut Trek
After completing the trek, I realized that small decisions helped me save a lot of money. There were many areas where unnecessary spending could have occurred, but by planning ahead, I managed to keep my budget under control.
Here are some key tips I followed:
- Travel in Groups: Sharing costs for accommodation, guides, and food significantly reduces expenses. If you’re trekking solo, try to find a group to join.
- Use Public Transport: Shared jeeps are much cheaper than private taxis. Booking train tickets in advance also helped me save money.
- Stay in Budget Accommodations: I chose trekkers’ huts and homestays over expensive lodges. These were not only cheaper but also gave me a more authentic experience.
- Carry Your Own Snacks: Buying food at higher altitudes is costly. Carrying dry fruits, energy bars, and instant noodles helped me save a lot.
- Borrow or Rent Gear: Instead of buying expensive trekking gear, I rented items like sleeping bags and trekking poles in Darjeeling. I also borrowed warm clothes from friends.
- Skip Luxury Expenses: I avoided fancy restaurants, unnecessary souvenirs, and extra services like hot showers, which cost extra in some places.
💰 How I saved money: I kept track of every rupee I spent, avoided unnecessary purchases, and made smart choices when it came to accommodation and food.
11. Sample Budget Breakdown for the Trek
Here’s a breakdown of how much I spent on different aspects of the trek. This helped me plan my budget in advance so that I wouldn’t end up overspending.
| Expense | Budget (₹) |
|---|---|
| Transport (To & Fro) | 1,500 – 2,500 |
| Permits & Fees | 200 – 500 |
| Accommodation | 250 – 500 per night |
| Food (Per Day) | 150 – 300 |
| Guide (Optional) | 1,000 – 1,200 per day |
| Miscellaneous | 500 – 1,000 |
| Total (Approx.) | 4,000 – 7,000 |
The biggest cost factors were transport and guide fees. But by using shared jeeps and splitting the guide cost with fellow trekkers, I was able to cut down my total expenses to under ₹7,000.
💰 How I saved money: I planned my daily spending and ensured I didn’t spend extra on things that weren’t necessary for the trek.
12. Alternative Budget Trekking Destinations
If you’re looking for other budget-friendly trekking destinations in India, I’d highly recommend considering these alternatives. I explored these options before settling on Sandakphu, and they are all amazing budget treks.
1. Kedarkantha Trek (Uttarakhand)
- Best Time: December to April
- Budget Estimate: ₹6,000 – ₹8,000
- Highlights: Snow-covered landscapes, moderate difficulty, and budget-friendly accommodation.
2. Triund Trek (Himachal Pradesh)
- Best Time: March to December
- Budget Estimate: ₹3,000 – ₹5,000
- Highlights: A short and easy trek near Dharamshala with stunning views of the Dhauladhar range.
3. Har Ki Dun Trek (Uttarakhand)
- Best Time: March to June, September to November
- Budget Estimate: ₹8,000 – ₹12,000
- Highlights: One of the most beautiful valleys in Uttarakhand, offering affordable homestays and local food.
💰 How I saved money: I compared multiple trek options before finalizing Sandakphu as the most affordable trek with breathtaking views.
Conclusion
My budget-friendly trek to Sandakphu and Phalut was one of the most memorable experiences of my life. I learned that with proper planning and smart decision-making, it’s possible to enjoy an incredible adventure without spending a fortune. By choosing the right season, finding affordable accommodation, sharing costs with other trekkers, and carrying my own essentials, I kept my budget in check while still having an unforgettable journey.
If you’re planning a trek on a tight budget, I highly recommend following these tips. Trekking is all about embracing the beauty of nature, and you don’t need to spend excessively to enjoy it. I hope my experience helps you plan your own adventure to Sandakphu Phalut without breaking the bank!