Keeping your makeup brushes clean is essential for maintaining healthy skin and achieving a flawless makeup application. While traditional cleaning methods can be time-consuming, the best electric makeup brush cleaner offers a quick and efficient solution. This guide will walk you through how to use an electric brush cleaner for the best results while keeping your brushes in top condition.
Why Choose an Electric Makeup Brush Cleaner?
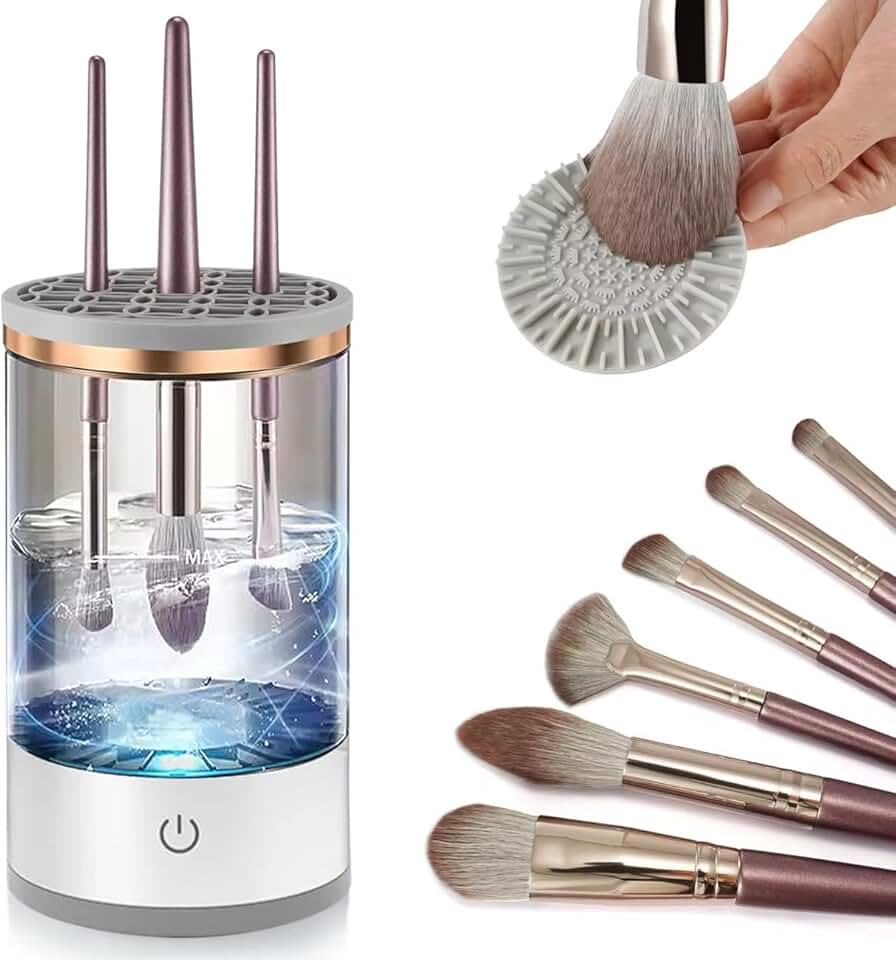
Unlike manual cleaning methods, an automatic makeup brush cleaner uses a motorized spinning mechanism to deep clean bristles without damaging them. Here’s why switching to an electric cleaner is a game-changer:
- Saves time – Cleans and dries brushes in seconds.
- Deep cleaning – Removes foundation, powders, and bacteria more effectively.
- Extends brush lifespan – Gentle spinning motion prevents damage to delicate bristles.
- Prevents skin issues – Regular cleaning eliminates bacteria that can cause breakouts.
Step-by-Step Guide to Using an Electric Makeup Brush Cleaner
Step 1: Gather Your Supplies
To get started, you will need:
- A spinning makeup brush cleaner (electric cleaner)
- A cleaning bowl (usually included with the cleaner)
- A mild makeup brush cleansing solution
- A towel for drying
Step 2: Attach the Brush to the Spinner
Most best electric makeup brush cleaners come with multiple rubber collars to fit different brush sizes. Choose the one that snugly holds your brush and attach it to the spinning device.
Step 3: Prepare the Cleaning Solution
Fill the cleaning bowl with warm water and add a few drops of a gentle makeup brush cleaner solution. Avoid using harsh soaps, as they can weaken the bristles over time.
Step 4: Dip and Spin
- Dip the brush into the solution while keeping the spinner off.
- Turn on the automatic makeup brush cleaner and allow the brush to spin in the water for 10-15 seconds.
- Lift the brush slightly above the water and let it spin for another 10-15 seconds to remove excess liquid and dirt.
Step 5: Rinse and Repeat if Needed
If your brush is still dirty, repeat the process until the water runs clear. For heavily stained brushes, consider soaking them for a few minutes before spinning.
Step 6: Dry Your Brushes
Once clean, hold the brush above the bowl and spin for an additional 10 seconds to remove excess water. Lay the brush flat on a towel to dry completely before using it again.
Tips for Maintaining Your Electric Makeup Brush Cleaner
To ensure the longevity of your spinning makeup brush cleaner, follow these maintenance tips:
- Clean the bowl after each use – Empty and rinse the cleaning bowl to prevent residue buildup.
- Replace rubber collars when needed – Over time, the rubber attachments may stretch or wear out.
- Use the right amount of cleanser – Too much soap can leave residue on the bristles, while too little may not effectively clean your brushes.
Common Mistakes to Avoid
While using an automatic makeup brush cleaner is easy, avoid these common mistakes:
- Over-soaking brushes – Leaving brushes submerged for too long can loosen the glue holding the bristles.
- Using the wrong cleaner – Harsh soaps can dry out bristles, making them stiff and prone to shedding.
- Skipping regular cleaning – Even with an electric cleaner, you should wash your brushes at least once a week to prevent bacteria buildup.
Final Thoughts
An electric makeup brush cleaner is a must-have tool for anyone looking to keep their brushes in pristine condition without the hassle of traditional cleaning. By following these steps, you can ensure that your makeup application remains flawless and your brushes last longer.
Investing in the best electric makeup brush cleaner is not only a time-saver but also a game-changer for maintaining hygiene and achieving professional-quality makeup looks. Try it today and experience the difference!