Introduction: The Adventure That Changed Everything
There’s something about the Himalayas that keeps calling me back. The crisp mountain air, the thrill of adventure, and the pure joy of pushing myself beyond my limits. When my friends and I decided to embark on a group trek to Pindari and Kafni Glacier, I knew this would be an adventure like no other.
But let’s be real—planning a group trek is no joke. Coordinating schedules, organizing logistics, and ensuring everyone is well-prepared can feel overwhelming. Thankfully, I figured it out (after lots of research and a few headaches). If you’re dreaming of taking your squad on this incredible trek, here’s exactly how I did it—with the help of a fantastic guide.
1. Why I Chose a Guide (And Why You Should Too!)
At first, we thought about doing this trek without a guide—how hard could it be, right? Well, after reading some horror stories of trekkers getting lost and struggling with permits, we decided a local guide was a must-have.
Our guide wasn’t just someone who showed us the way. He became our leader, problem-solver, and lifesaver throughout the trek. He knew the best paths to take, ensured we had enough food and shelter, and even helped us pace ourselves so we wouldn’t burn out. Without him, we would have likely struggled with navigation, accommodation, and, most importantly, safety. If you’re planning a group trek to pindari kafni glacier trek and want a hassle-free experience, I highly recommend The Searching Souls. They offer experienced guides, well-planned itineraries, comfortable accommodations, and delicious local meals, ensuring a safe and memorable adventure in the Himalayas.
Here’s why hiring a guide is totally worth it:
✔️ They know the terrain better than any online map.
✔️ They handle permits and logistics so we don’t have to.
✔️ They keep us safe in case of medical or weather emergencies.
To find the right guide, I checked reviews online, joined trekking groups on Facebook, and asked fellow trekkers for recommendations. It took some effort, but it was the best decision we made!
2. Picking the Best Time to Trek (Because Weather Matters!)
Trekking in the wrong season is a recipe for disaster. The weather in the Himalayas can be unpredictable, and choosing the right season can mean the difference between an amazing experience and a miserable one.
After lots of research, here’s what I found:
- April to June – The best time for warmer weather, but it can get crowded.
- July to September – Monsoon season! Landslides, slippery trails, and limited visibility make this a dangerous choice.
- September to November – Perfect weather, fewer crowds, and clear skies. This is when we went, and it was absolutely breathtaking.
- December to March – Freezing cold with deep snow, making the trek very challenging.
We decided on mid-October, and it turned out to be the ideal choice. The air was crisp, the views were stunning, and the crowds were minimal. We got to experience the best of both worlds—mild temperatures and post-monsoon greenery.
3. Planning the Perfect Itinerary (So No One Gets Left Behind!)
When trekking alone, you can afford to be flexible. But with a group, you need a solid itinerary to ensure everything runs smoothly. I spent hours researching and mapping out our route, making sure it was doable for everyone in our group.
Here’s the itinerary we followed:
🚙 Day 1: Kathgodam → Loharkhet (Drive)
🥾 Day 2: Loharkhet → Dhakuri (Trek – 9 km)
🏡 Day 3: Dhakuri → Khati (Trek – 8 km)
🌿 Day 4: Khati → Dwali (Trek – 11 km)
🧊 Day 5: Dwali → Phurkiya (Trek – 5 km)
❄️ Day 6: Phurkiya → Pindari Glacier → Dwali (Trek – 7 km)
🗻 Day 7: Dwali → Kafni Glacier → Dwali (Trek – 12 km)
🏡 Day 8: Dwali → Khati (Trek – 11 km)
🌲 Day 9: Khati → Dhakuri (Trek – 8 km)
🚙 Day 10: Dhakuri → Loharkhet → Kathgodam (Trek + Drive)
We covered around 90 km in total, and every single day was an adventure of its own. Some days were tougher than others, especially when we had to trek uphill for hours, but having a structured plan helped us stay on track.
💡 Pro Tip: Plan for a buffer day in case of delays due to weather or exhaustion.
4. Sorting Out Permits (Because Paperwork Can Be a Pain!)
One of the most confusing parts of planning was getting the necessary permits. I didn’t want us to be stopped halfway through the trek, so I made sure we got everything sorted in advance.
Here’s what we needed:
- Forest Department Permit – This was mandatory since the trek passes through protected forest areas.
- Inner Line Permit (ILP) – This wasn’t needed for our trek, but it’s good to check in case the rules change.
💡 Pro Tip: If you don’t have a guide, you’ll need to visit the Bageshwar or Kathgodam forest office to get your permits. Carry an ID proof (Aadhaar, passport, or voter ID) for verification.
5. Packing Like a Pro (So I Didn’t Freeze to Death!)
Packing for a high-altitude trek isn’t like packing for a weekend getaway. You need to be prepared for every scenario—rain, snow, cold nights, and long walking hours. I made sure to pack light but efficiently so I wasn’t carrying unnecessary weight.
Essential Trekking Gear
✔️ Backpack (50-60L) – Comfortable and lightweight
✔️ Trekking Shoes – Waterproof with good grip
✔️ Thermal Layers & Jackets – The nights are freezing
✔️ Raincoat/Poncho – Because mountain weather is unpredictable
✔️ Sleeping Bag – Even in guesthouses, a good sleeping bag helps
Food & Water Essentials
✔️ High-energy snacks (nuts, protein bars, chocolates)
✔️ Electrolyte powder to stay hydrated
✔️ A lifestraw or purification tablets (Safe drinking water isn’t always available)
Health & Safety Must-Haves
✔️ First-aid kit (painkillers, band-aids, antiseptic)
✔️ Diamox (for altitude sickness)
✔️ Sunscreen & Sunglasses (The sun at high altitudes is harsh)
💡 Pro Tip: Pack light! You don’t want to carry unnecessary weight at high altitudes.
6. Getting Fit for the Trek (Because It’s Not a Walk in the Park!)
Even though I’ve done a fair share of trekking, I knew that the Pindari and Kafni Glacier trek would challenge my endurance. The trek spans multiple days, involves walking long distances with steep ascents and descents, and crosses high-altitude terrain. Without the right physical preparation, I knew I’d struggle—and I didn’t want to be the one holding up the group!
So, I started training at least six weeks before the trek. My routine included:
🏃 Cardio Workouts – Running and stair climbing helped me improve endurance.
🧘 Yoga & Stretching – Increased my flexibility and helped prevent injuries.
🏋️ Strength Training – Focused on my legs, core, and shoulders to carry my backpack easily.
Apart from exercise, I also practiced walking with a loaded backpack to simulate the trek. This made a huge difference because it prepared my shoulders for carrying weight for long hours. Even my friends who weren’t into fitness started with long walks and weekend hikes and were able to complete the trek without major difficulties.
💡 Pro Tip: If you’re short on time, climbing stairs with a backpack is a great way to build stamina!
7. Booking Stay & Food (Because a Hungry Trekker Is a Cranky Trekker!)
Accommodation on the Pindari Kafni Glacier trek is pretty basic—don’t expect luxury hotels or fancy amenities. Most trekkers, including us, stay in simple guesthouses or dhabas along the route. These places offer simple but hearty meals, which is exactly what you need to keep your energy up.
Here’s what our stay looked like:
🏡 Guesthouses/Homestays – Cozy, warm, and run by friendly locals.
🏕️ Camping – Some groups prefer tents, but we opted for guesthouses.
🍲 Food – Think of hot dal-rice, roti-sabzi, and steaming cups of chai!
I was surprised at how well we ate during the trek. Every stop had at least one local dhaba where we could get fresh, hot meals. Even though the food was simple, after a long day of trekking, a plate of dal-chawal felt like a feast!
💡 Pro Tip: During peak season, pre-booking your stay through your guide can save you a lot of trouble!
8. Budgeting Smartly (Because Trekking Shouldn’t Break the Bank!)
A trek like this requires some investment, but it doesn’t have to cost a fortune. I made sure to calculate all the expenses in advance so that everyone in the group knew what to expect.
Breakdown of Costs per Person
| Expense | Cost (₹) |
|---|---|
| Guide Fee (10 Days) | 15,000 – 25,000 |
| Accommodation & Food | 7,000 – 10,000 |
| Transport (Train/Taxi) | 3,000 – 5,000 |
| Permits | 1,500 – 3,000 |
| Miscellaneous (Snacks, Gear, Tips) | 3,000 – 5,000 |
| Total Estimate | 25,000 – 40,000 |
Splitting costs as a group made things way more affordable. Since our guide took care of accommodation and food arrangements, we didn’t have to worry about hidden expenses.
💡 Pro Tip: If you already have trekking gear, this trek can be done on a budget of ₹25,000!
9. Staying Safe (Because I Didn’t Want Any “Lost Trekker” Stories!)
Safety was my biggest concern when planning this trek. The Himalayas are stunning, but they can be unforgiving if you’re not careful. I knew that without proper precautions, our group could face serious challenges like altitude sickness, unpredictable weather, or getting lost in remote trails. So, I took safety planning as seriously as the trek itself.
The first rule of trekking safety was simple: stick together. In the mountains, one wrong turn can lead to hours of wandering off-trail. To avoid this, we made a group rule—no one hikes alone, even for bathroom breaks. Our guide also gave us whistles to use in case anyone got separated. It may have seemed unnecessary at first, but trust me, when the trails get foggy and confusing, having a safety protocol in place is a lifesaver.
Another major concern was altitude sickness (AMS – Acute Mountain Sickness). Since we were ascending gradually, the risk was lower, but it wasn’t zero. Some of us felt mild symptoms like headaches, dizziness, and breathlessness, especially after reaching Phurkiya (the last stop before Pindari Glacier). We made sure to:
- To stay hydrated, consume three to four litres of water per day.
- Avoid alcohol and smoking, which can worsen altitude symptoms.
- Follow the golden rule: Climb high, sleep low. If we climbed to a higher altitude during the day, we returned to a lower altitude to sleep whenever possible.
- Carry Diamox (altitude sickness medicine), but only take it after consulting a doctor.
We also had a first-aid kit with painkillers, bandages, antiseptics, and ORS packets for dehydration. Our guide was trained in basic mountain rescue and carried a satellite phone for emergencies, which was reassuring since cell service was non-existent in most areas.
💡 Pro Tip: If you feel nauseous, extremely weak, or dizzy, don’t ignore it. Descend immediately—your health is more important than reaching the glacier!
10. What Surprised Me About the Trek
No matter how much research you do, some things just surprise you when you actually experience them. While I had expected beautiful landscapes and tough climbs, there were a few things that caught me off guard in the best way possible.
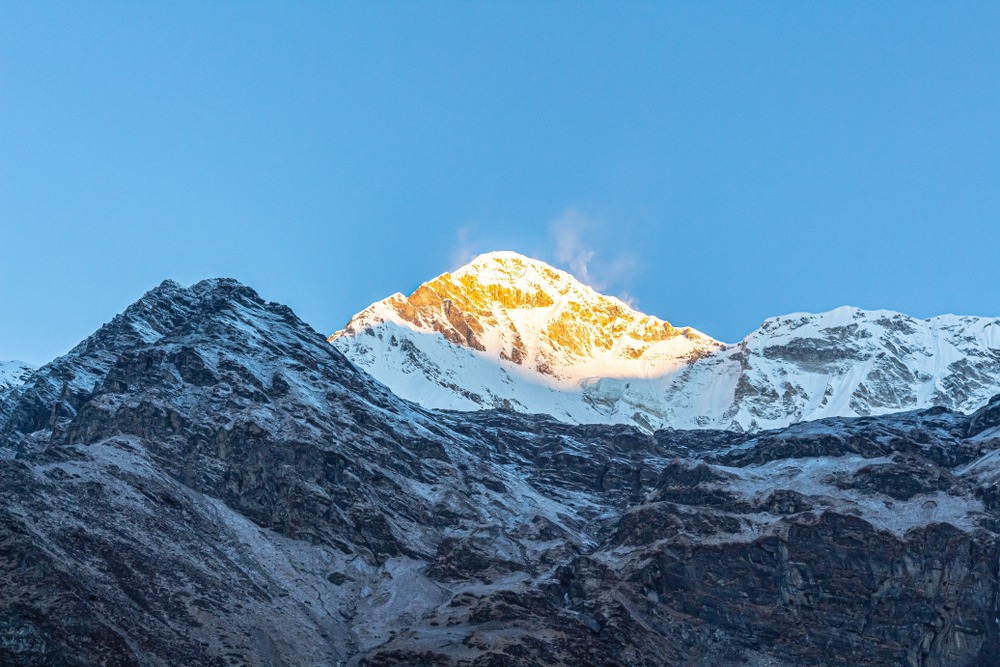
1. The Stunning Sunsets at Dhakuri
I had heard that Dhakuri is one of the most picturesque spots on the trek, but nothing could have prepared me for the jaw-dropping sunset views. Standing at 9,000 feet, I watched as the Himalayan peaks turned golden-pink, reflecting the last light of the day. It felt like time had stopped, and for a few minutes, everything was just pure magic.
2. The Warmth and Kindness of the Locals
The people in Khati and Dwali (two small villages on the trek) were some of the friendliest and most welcoming people I’ve ever met. Despite living in harsh mountain conditions, they greeted us with warm smiles and endless cups of chai. We even had the chance to sit by the fire and listen to their stories, which made the journey feel even more special.
3. The Last Stretch Was Tougher Than Expected
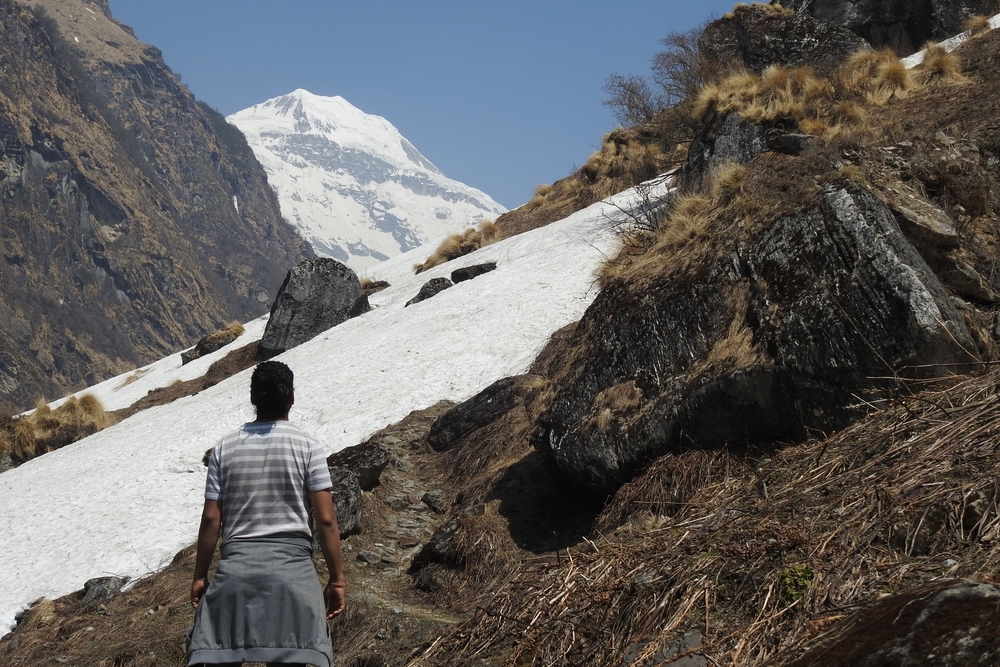
Even though I had trained for this trek, I wasn’t fully prepared for the final stretch to Pindari Glacier. The last 3 km from Phurkiya to the glacier was one of the hardest parts of the entire trek. The air was thin, the terrain was steep, and each step took double the effort. But when we finally reached the majestic ice field of Pindari Glacier, it was all worth it.
💡 Pro Tip: Sometimes, the most unexpected moments become the best memories, so stay open to surprises!
11. Why Trekking with Friends Made It More Fun
Trekking is an adventure, but trekking with friends? That’s a whole different level of fun! From sharing snacks on the trail to singing songs around a campfire, this trek was a million times better because I had my squad with me.
1. Motivation During Tough Times
Let’s be real—there were moments when I wanted to just sit down and give up. The steep climbs felt endless, and the high altitude made breathing harder. But having my friends around changed everything. We kept cheering each other on, cracking jokes, and reminding ourselves why we started.
2. Sharing the Best Views Together
Reaching a breathtaking viewpoint is great, but experiencing it with your best friends? That’s something else. Watching the snow-covered peaks of Nanda Devi and Nanda Kot together was a memory we’ll cherish forever.
3. The Inside Jokes & Stories
After spending 10 days together in the mountains, we ended up with so many hilarious inside jokes and stories. From tripping over rocks to mistaking a bush for a bear (yes, that actually happened), these moments made the trek unforgettable.
💡 Pro Tip: Choose your trekking buddies wisely—positive energy and teamwork matter more than trekking experience!
12. My Thoughts on Environmental Responsibility
Trekking is about connecting with nature, but it’s heartbreaking to see trails littered with plastic wrappers and bottles. When we started, our guide told us: “The mountains give us so much. We should give back by protecting them.” That became our trekking mantra.
How We Stayed Eco-Friendly:
♻️ Carried our own waste back—Every wrapper, tissue, or plastic item went into our trash bags.
🚫 Avoided single-use plastic—We used reusable water bottles and refilled them at natural water sources.
🌿 Stayed on marked trails—To avoid damaging fragile ecosystems.
🔥 Didn’t start campfires—Because they harm the forest and wildlife.
I realized that even small actions, like picking up one extra piece of trash, can make a big difference.
💡 Pro Tip: Follow the Leave No Trace policy—take nothing but memories, leave nothing but footprints!
13. How This Trek Changed Me
Something about the mountains changes you. Maybe it’s the silence, the majestic beauty, or the sheer effort it takes to reach the top. Either way, I walked away from this trek feeling different.
- I learned to appreciate the simple things—a warm meal, a good conversation, and a sunrise over the peaks.
- I realized that nature has a way of healing—it clears your mind and makes you see life differently.
- I discovered that I’m stronger than I thought—physically and mentally.
This trek wasn’t just about reaching Pindari and Kafni Glacier. It was about rediscovering myself in the Himalayas.
14. Final Advice for Future Trekkers
If you’re planning this trek, here’s what I wish someone had told me before I went:
✔️ Train at least a month before. You’ll thank yourself later.
✔️ Pack light but wisely. Every extra kg feels heavier at altitude.
✔️ Hire a guide—it makes everything easier.
✔️ Respect nature—leave no trash behind.
✔️ Enjoy the journey, not just the destination.
15. Would I Do It Again?
Absolutely! This trek pushed me out of my comfort zone, rewarded me with breathtaking views, and created memories that will last a lifetime. Maybe next time, I’ll even go deeper into the Himalayas!