If you’re someone who loves adventure but struggles to find time for long vacations, a weekend trek to Sar Pass is the perfect escape. Located in the breathtaking Parvati Valley of Himachal Pradesh, Sar Pass offers an exciting mix of dense forests, serene meadows, and snow-covered landscapes, making it one of the most rewarding short treks in India. I had the chance to experience this trek firsthand, and it was nothing short of magical.
This guide will take you through everything you need to know about planning a weekend trek to Sar Pass, including the best time to visit, how to reach, the perfect itinerary, what to pack, and crucial trekking tips. Whether you’re a beginner looking for an easy-to-moderate trek or an experienced trekker seeking a quick adventure, this guide has you covered.
Why I Chose Sar Pass for a Weekend Trek
The Stunning Landscapes Took My Breath Away
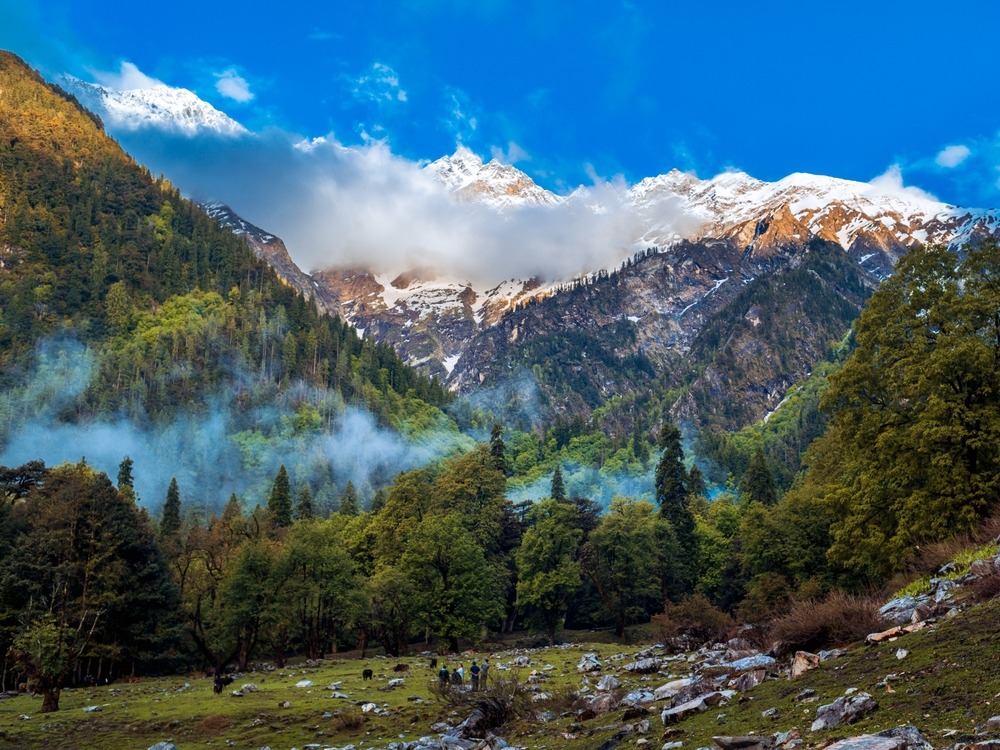
When I first heard about the Sar Pass trek, I was drawn to its promise of diverse landscapes. This trek offers everything—dense pine forests, picturesque villages, flowing rivers, open meadows, and snow-covered trails that make you feel like you’re in a winter wonderland. As I trekked through these stunning terrains, I realized why Sar Pass is considered one of the most scenic treks in Himachal Pradesh. The views from the pass itself were nothing short of breathtaking, with snow-capped peaks stretching as far as my eyes could see.
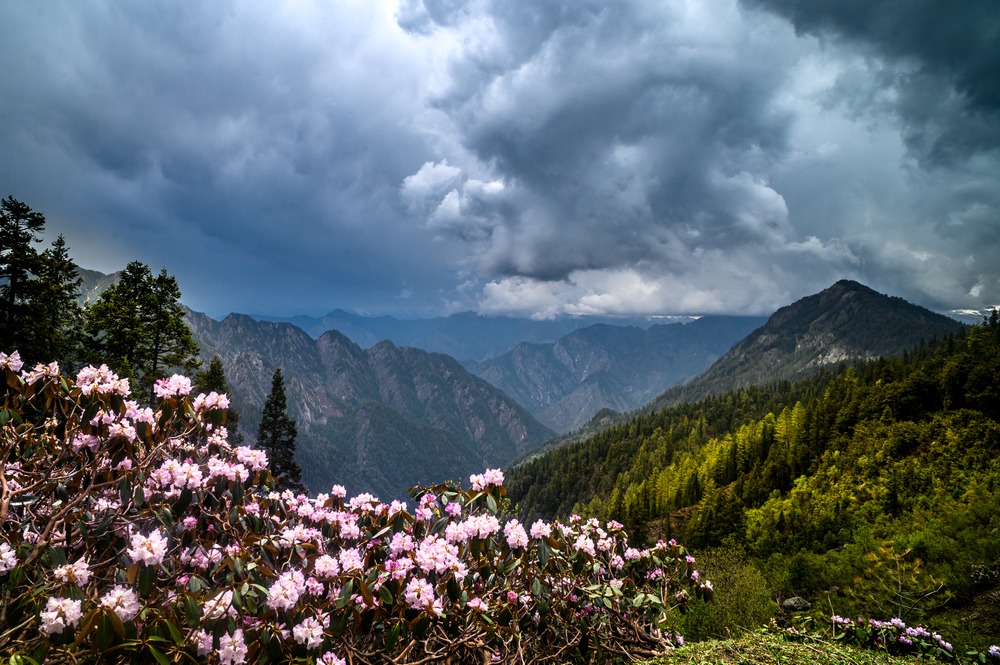
One of my favorite moments was walking through the rhododendron forests, where the bright pink flowers added a beautiful contrast to the green surroundings. Another highlight was the meadows of Biskeri Thach, where I saw horses grazing freely with the towering Himalayas in the background. Every turn on this trek presented a new postcard-worthy view, making it an unforgettable experience.
The Difficulty Level Was Just Right
As someone who enjoys trekking but doesn’t consider themselves an expert mountaineer, I wanted a trek that was challenging enough to feel rewarding but not so difficult that it would exhaust me completely. Sar Pass was perfect in this regard. The trek has a mix of gentle walks, steep ascents, and thrilling snow descents, making it an exciting journey from start to finish.
The first part of the trek from Kasol to Grahan was relatively easy, with gradual inclines. However, the real challenge began on the second day when I had to ascend steep slopes covered in snow. It was tough, but the feeling of reaching the pass made all the effort worth it. And then came the most exciting part—sliding down the snow-covered slopes on my way down! It was like nature’s own amusement park ride.
Best Time to Visit Sar Pass
May to June: The Perfect Season
I chose to trek Sar Pass in May, and I would highly recommend this time to anyone planning a trip. During these months, the weather is pleasant, with moderate temperatures during the day and chilly nights. The snow on the higher trails is still intact, giving you that perfect snow trekking experience. This is also the time when the meadows are at their greenest, making the landscapes look even more stunning.
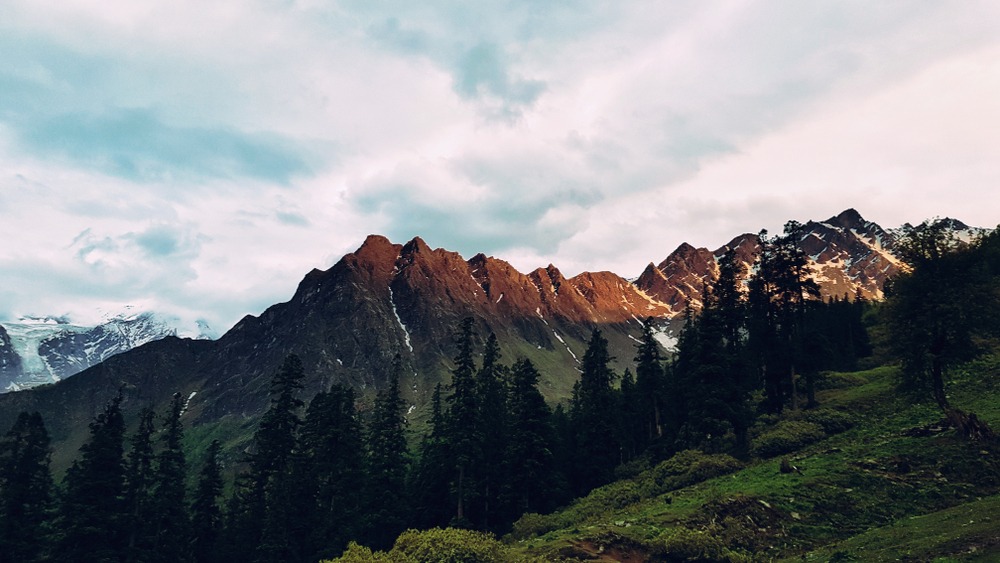
Another advantage of trekking during this season is the clear skies. I was able to witness some of the most beautiful sunrises and sunsets, with the mountains glowing in shades of orange and pink. The visibility was excellent, allowing me to take in the full grandeur of the Himalayas.
Monsoon and Post-Monsoon Considerations
While monsoons (July to August) make the valley look lush and beautiful, trekking during this time is risky due to slippery trails and the possibility of landslides. I met a few fellow trekkers who had attempted the trek during monsoons and had to turn back because of unexpected downpours.
September to October is another great time for this trek. The post-monsoon air is crisp, and the trails are less crowded. However, nights can get significantly colder, so carrying enough warm clothing is a must. If you’re someone who enjoys solitude and autumn landscapes, this might be the perfect time for you.
How I Got to Sar Pass
Getting to Kasol – The Starting Point
Kasol, the gateway to the Sar Pass trek, is a small yet vibrant town in Himachal Pradesh. Known as the ‘Mini Israel of India,’ Kasol is filled with charming cafes, backpacker hostels, and a laid-back vibe that makes it a great place to start an adventure. I arrived here a day before my trek to acclimatize and explore the surroundings.
From Delhi, I took an overnight Volvo bus to Bhuntar, a journey that lasted about 12-14 hours. From Bhuntar, I took a local bus to Kasol, which was another 1-2 hours of travel. The roads were winding, but the views of the Parvati River flowing alongside made the journey enjoyable. If you prefer flying, the nearest airport is in Bhuntar, just 31 km from Kasol.
Transport Options and Recommendations
If you’re coming from Chandigarh, the travel time is slightly shorter—about 8-9 hours to Bhuntar by bus. I met a few travelers who had rented bikes and ridden all the way from Chandigarh, which sounded like an exciting alternative if you love road trips.
For those traveling in groups, hiring a cab from Bhuntar to Kasol is a convenient option, though slightly expensive. The good news is that Kasol has plenty of budget-friendly hostels and guesthouses, making it an excellent place to spend the night before starting your trek.
If you’re planning a weekend trek to Sar Pass Trek and want a hassle-free experience, I highly recommend The Searching Souls. They offer well-organized trekking packages, including experienced guides, comfortable accommodations, delicious meals, and all necessary permits. With their expertise, you can focus on enjoying the adventure while they handle the logistics.
Do You Need Permits for the Sar Pass Trek?
No Special Permits for Indian Trekkers
One of the things I loved about this trek was that it didn’t require any complicated permits for Indian trekkers. Unlike some other Himalayan treks that require government approvals and fees, Sar Pass is relatively hassle-free. I simply had to register with my trekking group before we set off.
Foreign Nationals and Local Regulations
However, if you’re a foreign national, you’ll need to register at the local police station in Kasol before starting the trek. This is a standard procedure for all foreign travelers trekking in the region. It’s always a good idea to carry photocopies of your passport and visa just in case.
Regardless of your nationality, I strongly advise carrying a government-issued ID card. You never know when you might need it, especially if you plan to stay in homestays or camps along the way.
My Quick Weekend Itinerary for Sar Pass
Day 1: Kasol to Grahan Village – The Start of the Adventure
I arrived in Kasol early in the morning, ready to kick off my trek. The fresh mountain air, the sound of the Parvati River, and the relaxed vibe of this backpackers’ paradise made me feel instantly at home. After grabbing a quick breakfast at one of the local cafes, I met my trekking group and guide.
We began our journey towards Grahan Village, a remote yet charming Himalayan settlement about 10 km from Kasol. The trek took us through dense pine forests and alongside clear mountain streams. The sound of birds and the rustling of leaves made for a peaceful and refreshing experience. The path was mostly uphill but manageable, with gentle inclines and some rocky patches. Along the way, I stopped at small tea stalls where friendly locals served us steaming chai and Maggi, giving me a taste of simple mountain hospitality.
After about 4-5 hours of trekking, we reached Grahan Village. Nestled amidst towering mountains, this little village felt like stepping back in time. With traditional wooden houses and breathtaking valley views, it was the perfect place to unwind. I stayed in a homestay, where the host served us a delicious Himachali meal of dal, rice, and fresh vegetables. As the night fell, the sky lit up with countless stars—a sight I don’t get to see in city life.
Day 2: Grahan to Sar Pass and Descend to Biskeri Thach – The Big Day
We started early—around 4:30 AM—because this was going to be the most challenging yet rewarding day of the trek. After a quick breakfast, we set out towards Sar Pass, which lay at an altitude of 13,800 feet. The terrain gradually became steeper, and soon, we were walking on snow-covered trails. I had to be careful with my footing as some sections were slippery.
After several hours of trekking, we finally reached the pass. And let me tell you—the view from Sar Pass was worth every step of the climb. Surrounded by pristine white snow, with the Himalayan peaks stretching endlessly into the sky, I felt like I was on top of the world. The air was crisp and cold, but the sense of accomplishment kept me warm.
Then came the most exciting part—the descent. Instead of walking, we slid down the snowy slopes! This natural snow slide was an adrenaline rush like no other. I laughed and screamed as I slid down, feeling like a child again. It was among the most exciting things I have ever done.
After descending to Biskeri Thach, a stunning meadow with wildflowers and grazing horses, we took a short break before continuing towards Barshaini. From there, I took a taxi back to Kasol, where I ended my trek with a warm meal and a well-earned rest.
Packing List: What I Carried for the Trek
Packing wisely is crucial for a successful trek, and I made sure to carry everything I needed while keeping my backpack light. Here’s what I packed:
Clothing Essentials
- Thermal Innerwear – The nights can be freezing, so layering up is important.
- Trekking Pants – Quick-dry pants that are comfortable and lightweight.
- Fleece Jacket & Waterproof Jacket – For warmth and protection against unexpected rain.
- Gloves & Woolen Socks – Essential for handling the snow at higher altitudes.
- Cap & Sunglasses – The sun can be harsh in the mountains, and the reflection from the snow can strain your eyes.
Trekking Gear
- Sturdy Trekking Shoes – Good grip is essential, especially on snow.
- Lightweight Backpack – A 30-40L backpack is perfect for carrying essentials.
- Trekking Pole – This helped me balance on steep inclines and snowy trails.
- Headlamp – Early morning starts meant walking in the dark, so a headlamp was a must.
Food and Water Supplies
- Energy Bars & Dry Fruits – These kept me energized on the trail.
- Water Bottle with Purification Tablets – Safe drinking water isn’t always available, so it’s good to be prepared.
Fitness Tips: How I Prepared for the Trek
Even though the Sar Pass trek isn’t extremely difficult, being physically prepared made a huge difference in my experience. Here’s how I trained for it:
Cardio Workouts
Since trekking involves long hours of walking and climbing, I focused on improving my stamina through running and cycling. I made it a habit to jog for at least 30-40 minutes a day for a month before my trek.
Strength Training
I knew that I’d be carrying a backpack, so I included leg workouts like squats, lunges, and step-ups in my routine. Strengthening my legs helped me handle the steep climbs better. I also did core exercises like planks and sit-ups, which helped with overall endurance.
Backpack Training
A week before my trek, I started walking around my neighborhood with my fully packed backpack to get used to carrying the weight. This small step helped me adjust to trekking with gear on my back.
Safety Tips I Followed
Trekking in the Himalayas is an incredible experience, but it comes with risks. Here’s how I stayed safe:
Acclimatization
Since Sar Pass is at a high altitude, altitude sickness can be a concern. I made sure to drink plenty of water, avoid alcohol, and trek at a slow, steady pace to help my body adjust to the altitude.
Basic First-Aid Kit
I carried painkillers, band-aids, antiseptic cream, and altitude sickness tablets just in case. Fortunately, I didn’t need them, but it’s always better to be prepared.
Emergency Contact and Planning
I informed my family about my trekking plan and checked in whenever I got mobile network coverage. Having a backup plan in case of bad weather or health issues is always a smart move.
Where I Stayed: Accommodation Options
Kasol has plenty of budget-friendly options for trekkers. Here’s where I stayed:
- In Kasol: A cozy backpacker hostel with dorm beds for ₹500 per night.
- In Grahan: A charming homestay that provided a warm meal and a comfy bed for just ₹700.
- Camping: Some trekkers chose to camp, but I preferred the warmth of homestays!
Budget Breakdown: How Much My Trek Cost
| Expense | Approximate Cost (INR) |
|---|---|
| Bus from Delhi to Kasol | 1,200 – 1,500 |
| Accommodation | 500 – 1,000 per night |
| Food | 400 – 800 per day |
| Guide (Optional) | 1,500 – 2,500 |
| Miscellaneous | 500 – 1,000 |
| Total Cost | 4,000 – 7,000 |
Final Tips for a Perfect Weekend Trek
- Start Early: This gave me more time to enjoy the trek without rushing.
- Travel Light: Every extra kg in my backpack felt heavier as I climbed higher.
- Respect Nature: I carried my trash back to Kasol to keep the trails clean.
- Stay Hydrated: Dehydration at high altitudes can be dangerous.
Conclusion
My weekend trek to Sar Pass was an unforgettable experience. In just two days, I walked through lush forests, trekked on snowy trails, slid down slopes, and witnessed some of the most stunning Himalayan views. If you’re looking for a short but adventurous escape, Sar Pass is a trek you shouldn’t miss. Pack your bags, prepare well, and get ready for an adventure of a lifetime!
FAQs
- Can beginners do the Sar Pass trek?
Yes! It’s a moderate trek, and with some preparation, even first-time trekkers can complete it. - Is a guide necessary for Sar Pass?
Not mandatory, but hiring a guide makes navigation easier, especially on snowy trails. - Are there ATMs in Kasol?
Yes, but they often run out of cash. Carry enough cash from your city. - What is the mobile network availability on the trek?
Limited. Expect patchy network coverage after Kasol. - Is it safe for solo trekkers?
Yes, but it’s always best to trek in a group for safety.